Archive for the ‘Crafts’ Category

DIY Mustache Mugs


After seeing these mugs here at Nap Time Crafts (one of a million projects of hers that I would love to replicate) I knew that I had to make a few for Father’s day gifts.  They are so cute and definite conversation pieces!!!


I snagged up some mugs at Michael’s because I already had the glass paint along with the step 1 and step 3 coats that go with it.  They sell all three steps at Michael’s and the paint is for ceramic or glass.  Once you apply all three steps the pieces are supposed to be microwave and dishwasher safe!

My mistake here was not reading the mugs until I got home!  These mugs pictured above specifically say on them that they are for decorative purposes only.  It may only mean if you use the markers on them (they came with markers), but I didn’t want to chance it and have a mug blow up in grandpa’s microwave!

I hopped it the truck and headed to Target where I found these mugs.  They were $3.99 each which is more than I thought that I would be spending on these, but still a pretty cheap gift since I already had the glass paints.  These are microwave and dishwasher safe too!


I made a stencil using SCAL on my cricut with vinyl.  I prepped both mugs with step 1 conditioner and let them dry.  I then placed the stencils on both mugs, painted the black on, and let them dry.  Mistake number one.

I read in the post above that her mustache was pulling off a bit when she pulled the stencil.  Mine was not just coming off a bit.  It was completely coming off and I was unable to just pull it.  It was ripping and stretching horrible.  I had to pull both stencils with the mustaches completely off the mugs and recondition them.

On my next try I made new stencils and painted.  I then immediately pulled the stencils off while the black was still wet.  I did this slowly and carefully, but it worked!!!  I let them dry.

I then put the step three on the mugs and set the mugs standing up to dry.  Mistake number two!  Do not stand them up and apply the glaze and expect the mustache not to slide… smudge.. wrinkle.. crease… ugh!  I had to quickly and gently move the mustache back to where I had it and lay the mugs down to dry.  (No pics of this because I panicked and just tried to quickly fix it… with tears in my eyes… 😦  )

Even after I did this the mugs dried a bit weird.  One had a few bubbles and one got a few cracks in the black where you could see the white through if you looked really close.  These were for my husband’s father (grandpa) and my mom’s husband so I gave them to them anyway and they still thought that they were great!


Here is my little man trying one out!  He thought they were super!  You should have seen his face when Grandpa was holding the mug up to his own face!


I think that these make a super cute gift and now I know what not to do for next time!

DIY Wooden Firecrackers Fourth of July Decor

I found a post here at Nap Time Crafts where she made these because she saw the post here at Poppies at Play and I decided to have a crafty day with my mom.

I had the hubs cut me some pieces of wood that were squared and about the same dimensions as stated on the Nap Time Crafts post.  Mine came out to be about 1 1/2 in. squared and 4, 6, and 8 inches tall per set.

Mom and I each made two sets.

I got red, white and blue acrylic paint.  I made some card stock templates on the cricut (because I was being stingy with my vinyl and didn’t want to waste it… bad idea.. more info on that to come.).

We took everything outside… including my three kiddos three and under… and set up shop in the yard.

So… we did the base coats and let those dry while tending to small people.  When we tried to just hold the cardstock stencils… um… they didn’t work all that great.  In the end…. they aren’t that bad because we were able to fix them up a bit, but the regular cardstock stencil bled and leaked even when I tried to just lightly do it and do it slowly.  FYI.

I would use vinyl or at least something plastic like if I did it again.


Here is how my two sets came out…

I kept mine quite similar to the ones that Nap Time Crafts did and did both sets the same.  I have a bit of a matchy matchy… ocd-ish type issue going on.

Mom is a bit more out of the box.  She used an old toothbrush that I keep in my paint stuff to make one set speckled and she did some different designs.  She made a speckled set and a non-speckled set.  Here is how hers came out.

So… we decided that we aren’t so sure ours look like “firecrackers” and didn’t end up putting the wick in the top of them.  I still might, but I am unsure if they should just be red, white and blue Americana decor or if they should be firecrackers.

I think they came out cute either way.

What do ya think?  Wick… or no wick???  (See the links to the others if you want to see what theirs look like… with wicks.)


Father’s Day Personalized Snack Six Pack

I found this idea on Sisters’ Stuff a bit back and knew that I had to try it out for hubby since he is a super snack-aholic.  I also found a version on Nap Time Crafts.  She has a ton of great stuff.

It turned out to be a bit more than I planned on… with time and energy… and money really, but I think it came out cute and that he will like it tomorrow.

I used a six pack of Corona.  We “disposed” of the beer and I washed the bottles out with soapy water.  It takes quite a few times of rinsing to not get suds anymore.  I rinsed them in super duper hot water so that they would dry better, but still needed to jam rolled up paper towels up in there and twist to get them dried a bit better.

I got out a pack of coordinating scrapbook papers that I had.  All of the paper shown here was in one pack that I got for a buck at our dollar store called Real Deals.  They have super deals on paper packs once in a while.

I put the paper down and just traced the box leaving a bit around the edges to fold over.  I basically wrapped the box… present style.

I got all of the pieces cut out and ready to cover the box and made labels for each side.  I also realized that the paper with the bigger circles on it… happened to be perfect for the pieces to cover the caps.  The circles fit perfectly.  Nice.

I used the same sayings that she had on her labels.  I just wrote them on this paper with fine tip sharpie and cut them out by hand.

I covered the box and attached the labels. (I just used double sided scrapbooking tape to cover the box, bottles, and attach all labels.)

Then I covered the bottles with pieces of paper that I cut after just measuring around and adding a bit for overlap…. filled the bottles with my hubby’s favorite goodies (popcorn, mixed nuts, m&m’s, mike and ike, whoppers, and Reese’s pieces)… put the tops back on (that I was sure to carefully take off before)… and used a glue dot to stick the circle on.

I didn’t bother putting pictures on each bottle or doing different papers.  I think it was cute enough like this, but you could always switch it up.

Place all bottles in box… and Waalaaa!

So… There it is… different… cute …. creative….  I think it came out nice and even if it took more than I thought it would… he is worth it.  He is an amazing hubby and daddy!!!

Happy Father’s Day!!!

DIY Japanese Zen Wall Art

I recently realized that my whole house basically has a different area of the world as it’s main decor theme.  I didn’t really know what the bathroom theme was until I found some examples of Japanese Zen decor and decided that I already basically had that going on.

I wanted to change up the wall art in there and I am still not sure what I wanted on the walls.  I am thinking foliage, greens, grasses….

So… for the time being at least…. I found some faux fern and leaves that I had in my craft stuff and framed them in some white dollar store frames on top of some scrapbooking paper that came in a big pack from the dollar store.  This is what I came up with… for now at least.

I wanted to include the widened out picture to show that the white frames were to bring everything together with the white appliances, fixtures, and cabinets in my bathroom.

I bought these white frames and used the same brown paper previously to frame out sepia toned photos of my kids playing in the tub.

Spring Wreath Turned Summer Wreath?

I picked up a few bunches of flowers from the Dollar General in white and purple to coordinate with the hurricane vases that I did.  They were a buck a bunch and I ended up only using one bunch of white and one of purple here.

I wanted to add something to this wreath to be able to use it all through summer too and get my moneys worth out of the pretty yellow wreath.  I used some wire snips and clipped each bunch of flowers from the main bunch and just spaced them evenly around the wreath doing the purple first and then putting the white in between each purple bunch.

My orange butterfly has been fading from the sun… so I am wondering if I should remove it.

I only stuck the flowers in for now and plan to attach them with floral wire once I decide that they will stay for a while.

So… what do ya think?

Before- (spring wreath version)

After-

*Update-  I didn’t like the butterfly on there still… both due to the fading and because the orange seemed out of place so I removed it and the hummingbird.  Now do I leave it like this… with just these flowers?  Do I add a few.. say three bigger flowers of either purple or white?  Do they have to be the same type of flower .. though…?  Do I add some sort of ribbon… bow… other embellishment instead???  hmmm….


Father’s Day Finds

I am still not sure that I will be committing as I should to this blog, but I had a few things that I would like to post about and might actually have the time to post a few things.  I am not sure how religious I will be about it…. hasn’t been great lately…. but here goes.

Father’s Day is approaching… June 19th this year for those of you who haven’t checked into that yet.  I usually do some simple gifts for hubby that are homemade from the kids and/or include cute photos of the kids.  With our first child…. a son…. I started a thing where I take his picture in one of Daddy’s shirts, a tie, and standing in his work shoes.  I have done this same thing each year and plan to do it again this year.  When we had more kids…. two girls…. I didn’t think I should do the same work shirt thing.  I take some cute pics of the kids together and usually do the mug/ mouse pad thing for work and still do the shirt thing because it has become a bit of a tradition.

I have been looking around on some blogs today and found a few cute things to share.  I love the homemade gifts for father’s day especially if the kids help to make them.  I had to share a few….

*Update- I had a cute hamburger cake on here…. I am sure you could just google it and find a picture to copy and make.  It is basically a stacked round cake pan cake that is frosted to look like a burger.  It uses light brown for the bun, dark brown for the burger, a ring of yellow for cheese, red for ketchup, and then little leaves of green lettuce poking out here and there.  I had to update this and remove it after the person that I was trying to compliment by putting it in my post tweaked out and left me several messages that I needed to immediately remove it.  I notified them after posting that I posted it, but I guess I was supposed to get prior approval.  Whoops.  I never mean to offend anyone… just to compliment them by sharing their awesome ideas.  I tried to at least notify everyone that I included in this post…. and didn’t take the time to find each blogs personal sharing policy.  Oops…


Anywho….    Hopefully it is still okay that I shared these others.


Nothing But Country has a free printable for the AWesome Dad printable to attach to a pack of root beer.  Too cute.

My husband would LOVE this Daddy’s Six Pack idea from While He Was Napping.  He is a junk food junkie big time (and still has the totally hard stomach rocking body as when I married him… sooo not fair!!!).

DSC_2169

And… if you want to go all sorts of talented and time consuming… these are SUPER cute, but would take me forever….. from Somewhat Simple.

Yes… that remote is a cookie!!!  omg….

So.. the kids are already getting squirmy.  I got a short post done.  I would like to post a few other ideas today… recipes… and a Summer Bucket List idea that I am working on.  Maybe….. I will get to it.

Silhouette Giveaway at A Bowl Full of Lemons

Go here to A Bowl Full of Lemons and see her awesome giveaway for a Silhouette pack!!!  What a deal!  You can also see some cool ideas on how to use a Silhouette or a Cricut or other cutting machine if you already have one.

Check it out!

Bows and Flowers as Hair, Shoe, and Shirt Clips

This is what I did today at nap time…  even though only one of three was napping… I still got a bit done.

My idea was to have bows and flowers that can be used as hair clips (individually or as a set), as hair clips, or on shirts.  I didn’t want to have to make separate sets for each so I decided velcro could solve my little issue.

I found some shoes that I had been gathering (hand me down, second hand, or super clearance with coupon almost free).  These are all the ones that I found in storage that are the size my older daughter is going into for Spring/Summer season.

I got together the plain colored ones that I could switch out embellishments to make a bit more fun.

These are some cute white shoes, but they could be cuter.

Stitch pick the bow and remove.

Clean up the shoe and add velcro.  I used sticky velcro and hot glue.

Make a ton of bows and flowers that have velcro on the backs of them.

And….. swap out the fun stuff to make this one white pair of shoes turn into many many pair of super cute shoes.

I also made this little piece out of felt that has a bit of velcro on each end so that I can attach the embellishments around a strap without adding velcro to the strap.

(These aren’t exactly the cutest color combos, but I was working fast and just wanted to try out the concept.  There will be many more ideas of attachments including organza flowers, beads, lace….)

These two were also done using the felt strap part.

Use alligator clips with basic colors glued to them as a base.  Add velcro….. and you can swap out the bows and flowers on the alligator clip.  These clips are great because they can be clipped to headbands for my girls that don’t have much for hair.

I made this faux necklace shirt a while back and have been waiting to add a flower or bow to one side.  Today… I added velcro (just the sticky kind to see how it looked, but I want to add the sew on velcro for longevity.)  Now I can swap out the embellishment on this too.

So… that is what I came up with for now.  I have a ton of ideas and quite a bit of supplies.  I would like to make shoe clips for my shoes too and I have all sorts of plans for different beads, flowers, lace, fabric, felt, twisting, twirling, cutting, pom poms…….. the possibilities are endless now.

What do ya think???  Neat… right…. ???

(I also made a tutu today….. and want to post pics of that with my model showing it off….. and want to post pics of these shoes, shirt, and hair clips with my two models showing them off when I get a chance to convince them to cooperate.  🙂  )

More Spring/Easter Decor and Crafts 2011

Since Spring officially started (even though northern ny weather begs to differ- as it is snowing right now.. urgh) this weekend, I decided to try and round up a few more Spring/Easter decor, craft, and recipe type ideas.  Here are a few that I could pop up real quick.  I will be hunting for more….

I saw these pedestal birdhouses in some catalog or on another site and they were quite expensive.  I love the look of them for spring and would totally use them on my porch or screened in front room (if I had one) all year round.

These are over at The Speckled Dog and she shows you how she made them using some unfinished bird houses and candle sticks.

This tray of nests and eggs is also from The Speckled Dog.  How cute?  She used an old thrifted wooden tray that she painted and distressed and the nests and eggs are from Target for about five bucks!

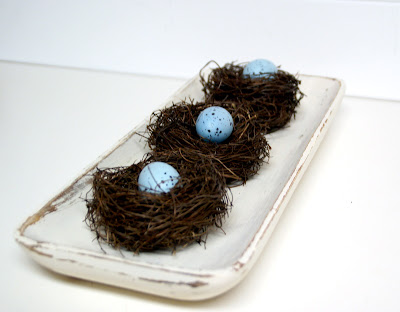
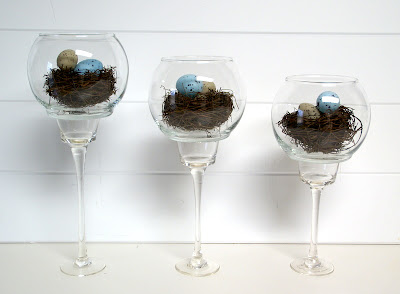
She used the same nests and eggs combined with Dollar Tree glassware to make these!!!  OMG cute….

Loving this Easter subway art over at Grunged, Glittered, and Branded.

I was thinking this felt flower pillow was quite the way to brighten up a chair or couch for spring time.  See it over at Craftaholics anonymous.

[peep[4].jpg]

These chocolate covered marshmallow peeps are so cute over at The Idea Room.

St. Patty’s Craft and Recipe Round Up

I haven’t tried any of these recipes or craft ideas, but thought that I should hurry up and share some that I have been finding in case you wanted to actually try them before or on St. Patty’s.

Go to Hoosier Homemade to see how to make these super cute Shamrock Pretzels and some Irish Soda Bread.

Go to Homemade Mamas to see how she has the kiddos make these easy and fun St. Patty’s pot-o-gold decoration.

Counting Bunnies Too made this tutu, headband, and legging combo for a friend’s daughter.

Also from Hoosier Homemade were these rainbow cupcakes and rainbow ice cream.  Love these…..

Photobucket

Little Wonders’ Days shows quite a few rainbow ideas to use with the kids… including this yummy looking rainbow fruit pizza.

Sweet Little Smoothie did this Lucky Buttons Mini Pillow.

Sun Scholars

How stinkin’ cute are these Ice Cream Leprechauns over at .  She includes the tutorial on how to create your own.

Rainbow waffles are over at Random Thoughts of a SUPERMOM.

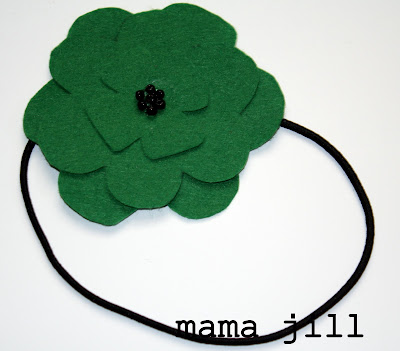
All you need is felt, beads, a headband, and glue gun to make this really cute St. Patty’s Day headband like she did over at Mama Jill.

You can find the recipe to these St. Patty’s Day Marble Cookies over at Red Couch Recipes.


Okay… that is it for now, but I am seeing a ton of Spring and Easter stuff that I love already.  I will have to do a few posts on those later on.